Sunday, November 2, 2008
Return of the cob workshop
After a lengthy break as we slowly acclimatise to the house, we are going to start workshops again: now on the second Saturday of each month, i.e. next month on December 13th, from 9am to 1pm, tea provided, R50 donation to building costs suggested (but we won't turn you away if you can't make that in these financially constricted times). The one after is on January 10th. For more info contact us on 021 788 6613.
Friday, October 31, 2008
Seagrass in the guest room
 Brightfields have kindly sponsored us a natural fibre carpet - made from seagrass. This is one of several types they sell, and makes a welcome alternative to most carpets on the market.
 The area carpeted is our guest bedroom of the B&B, which is (in a low-key kind of way)open for business, contact us if you want to know more for this summer season! The furnishing is quite a slow process as we seek the most organic options. More photos of the room coming soon!
Monday, August 25, 2008
Still a construction site, at a slower pace!
 We got through this cold winter without much need for heaters but still we do want a proper fireplace for next year. Here'a view through the hole we've cut upstairs where the flue will go! Other planned constructions still to come are some internal strawbale/cob seats, and some more shelves cobbed in to some corners.
 OK, so it's early days, but we've been playing inside too, with the first stages of creating an under-stair cupboard, hidden by adobe brick walls. These bricks were donated by Gary and Anthea (thanks guys!) as they had an excess and we had a bit of time constraint about getting our own strong enough and dry enough to use. As mentioned elsewhere, adobe is handy for thinner walls that go up quickly, if they're not as structurally essential. We're going to cob in some sleepers above the big cob counter you can see, which has wood storage holes, made with the help of a bit of chicken-wire framing. There's a small seat emerging to the left of the fireplace too.
Interior painting too...
 We've added two bottom steps out of cob to our staircase. They have yet to be finished and sealed, unlike the floor itself - which you can see under the steps, with a similar 'paint' to that used on the interior walls, but also the sealant we mentioned before. It's not perfect yet, and will definitely need judicious use of rugs or even slate tiles in heavy traffic areas; but it is beautiful and surprisingly soft!
 Here's our staircase, finished on the left - unfinished on the right! The finished wall has a similar paint to outside, lime, tumeric, and a redder clay than outside onto the plaster, plus an eco-friendly 'plaster primer' sealer.
Thursday, August 21, 2008
Exterior painting
 We've been sprucing up for spring! These are outside walls that have now been painted (and re-sealed, of course, in the case of the big window frames)The paint is basically a mix of lime, water, tumeric, and a little clay for colour, though we've used a darker oxide too on the south side of the house (not shown here).


Friday, August 15, 2008
All the photos
You can see all the photos from the blog - and a slideshow with Picasa - if you follow this link.
 |
| Cobhouse |
The Tyre Wall

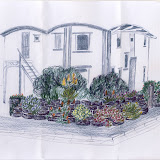
Those people that have been past our plot recently may have been bemused to see a load of car tyres around our perimeter (within the already rather unattractive basic fence we have had up during building). The idea is to create a 'green' security wall - with spiky indigenous plants at the top. Over time the tyres will get covered in foliage, though at the moment they need some reorganising to put them into place. We have in the mean time been focusing on the first bits of maintenance - re-coating the poles and big window frames in environmentally friendly sealant as they have been up and exposed for quite a while now! Soon we will be able to give the garden (or rather dust bowl...) the attention it deserves.
If you're interested in tyre walls, have a search on:
www.strawbalefutures.org.uk
my.gardenguides.com
greenlivingaustralia.com
Thanks to Rianna, our artistic neighbour, for the artist's impression!
Friday, July 18, 2008
Why we're doing it
"Not satisfied or confident that life can be renewed, unwilling and afraid to grow old, to gradually become magnificent, treelike elders, or die into cultural humus, the modern man or woman demands the permanence of steel cities and immortality... such individuals are like cornered cats, frozen in the anxious void of modern communities... Violence is close behind when people won't come together to remake each others' houses."
(Martin Prechtel, native American shaman).
Of course, if we maintain it, this house will last long. But it has been built by a community and will be maintained by communal effort. This is the kind of building - houses and communities together - that South Africa needs - urgently!
(Martin Prechtel, native American shaman).
Of course, if we maintain it, this house will last long. But it has been built by a community and will be maintained by communal effort. This is the kind of building - houses and communities together - that South Africa needs - urgently!
Monday, July 14, 2008
Finishing up

Well, we moved in a couple of months ago - so things have slowed up a little on the final bits and pieces. Externally, there are some plaster areas you can see here we've been waiting for a while to finish off: here Amos deftly throws up for Ntokozo to put onto the south wall.

The wood faces on the north side are difficult to waterproof - but Flanagan Construction have really helped us out here with good ideas on doing so while still leaving the work looking neat, thanks to Carl in particular whose work you can see here on the joins between floors, and of course to Charlie who helped us out with the bigger picture.


 Here's Wazeer putting in the 'beam filler' - wood that all had to be individually cut to join the curved roof to the straight window tops.

 Inside, most of the walls have been painted using our own mix of lime, clay and tumeric, on site, then sealed naturally. But in some places - like here in the kids' room - we wanted something brighter. Conventional paints play havoc with cob walls so we've tried a few of the natural options - this is a primrose yellow from Breathecoat.
Friday, April 18, 2008
Sculptural fun
 One great reason for working with cob is it's ideal for creating niches and unusual shapes. Here's our bedroom wall - and the artist in her studio!
 You can build in shelves out of spare pieces of wood, without needing any nails; or you can just knock holes out of the wall to create extra variety.
 Here's our own little church/temple effect downstairs!
Sponsored Roof Window!
 What we've really enjoyed about getting up on the roof and completing it has been the view. Now we have very kindly been donated a Velux roof window, by Andrew Renirie of Cape Loft Windows, part of Savati. It is a great example of passive solar light/heat as it captures the sun overhead most of the day; and it's openable so we can get through to the roof.
  We have also included an unusual central 'quiet space' in the house (known in Indian architectural theory as a 'Brahmasthan') which is open both to the ground (no foundation) and the sky. Waterproofing this area was quite a complex problem but Andrew and Savati have come to our aid again by creating and donating a kind of metal 'chimney' which should really help matters.
Laying the floor
 The floor has had a concrete slab, as we're in Muizenberg by the sea and vlei and the water table level is an issue! However, we've put in a lovely warm earth floor on top of it. It's got horse dung in it in place of straw, as a binder. The dung has to be well soaked and separated or you get black patches of dung showing up in the floor (we had to fix a couple of areas); but otherwise it's similar to mixing cob (and really not smelly!)
 If you lay the whole lot at once it'll crack as it dries, but if you do it in layers you need to ensure the top is roughened so that the next layer will bond nicely to it.
 The next layer was much smoother but you need to stay off it for a few weeks. We humans managed to do so, but not everyone did...
 This has then been fixed up and a thin top layer put in certain places, with the traditional 'feta lid' burnishing happening once things were fully dry. At time of writing downstairs has not been sealed yet - an Envirotouch rock sealant is going to be used for this. You can see something of the final burnishing through the pentagon hole here: this has just been closed up with a specially cut piece of plywood! The top floor has been sanded and then sealed with Envirotouch wood sealant for floors.
Monday, March 3, 2008
March Update
 We're a bit reliant on others for photos at the moment owing to a mishap with our camera. All these photos have been offered for our personal use on the blog but not necessarily for you to re-use. Thanks to Mark Wessels for this family shot, which shows the house with bitumen gum unceremoniously draped over the roof. Our cobbing team learned to sew the waterproofing together (with the aid of a blowtorch!) Of course the cob insulation is totally fireproof, which came in handy with a south-easter pumping all week we were putting it on. Doing it ourselves saved a bunch of rands and gave our guys experience with a new skill - on a very complicated roof.
 This one's thanks to Esa Alexander of The Timeswhich did an article earlier this year.
 Here's a view from the roof, when we were covering the leichtlehm with a simple clay/sand mix for smoothness. It looked beautiful until we added the bitumen-gum waterproofing on top! (Thanks to Ian Evans from the UK Independent).
  Here's another shot (thanks to Linda!) of the side before the front door went in. There's supposed to be a wood panel above around a built-in cupboard: all our hold-ups at this stage are around carpentry, and although the cobbing and plastering took over a year in total (including inside plastering), it would have been no quicker any other way given the amount of specialist wood in this house. YOUR cob house could involve a lot less wood to speed things up and cheapen them; although the wood is, of course, very beautiful!
Saturday, January 19, 2008
Electrics - and that girder
 In most houses you get a series circuit of electricity conduits around you as you stand or sit in a room, meaning you are constantly contained within an electromagnetic field - not the healthiest way to live. Our cob floor is yet to go in, so our maze of conduits is mostly going below our feet, and where not it's going straight up and down the walls between floors, avoiding much of the electromagnetic field effect.
 At last - the engineering feat of the girder is safely positioned above the garage entrance so we can cob the final upstairs wall (or rather, mostly, adobe brick it).
 Recent publications including shots of the house include Men's Health Living (November issue) and Home magazine (Jan 2008 issue).
Roof insulation
 First insulating layer is cardboard, this is used pretty widely for insulation but we're using flat boxes as it's also to cover gaps in the timber so that no clay dust comes through from the next layer.
 Next layer is called "leichtlehm" - presumably a German invention, it means 'light-clay'. Made with as much straw as can soak up a sand/clay mix and water. You could do this barefoot (I did!) but it's quite prickly.
 Then comes the complicated bit - getting it up two stories in a convoy of buckets and pulleys...
 Finally it gets put in place, about 10cm thick in the end after much stamping down. As with the cardboard, we're just covering the area over the internal part of the house.
Subscribe to:
Posts (Atom)